Woodworker's Journal 2004 Spring, страница 15
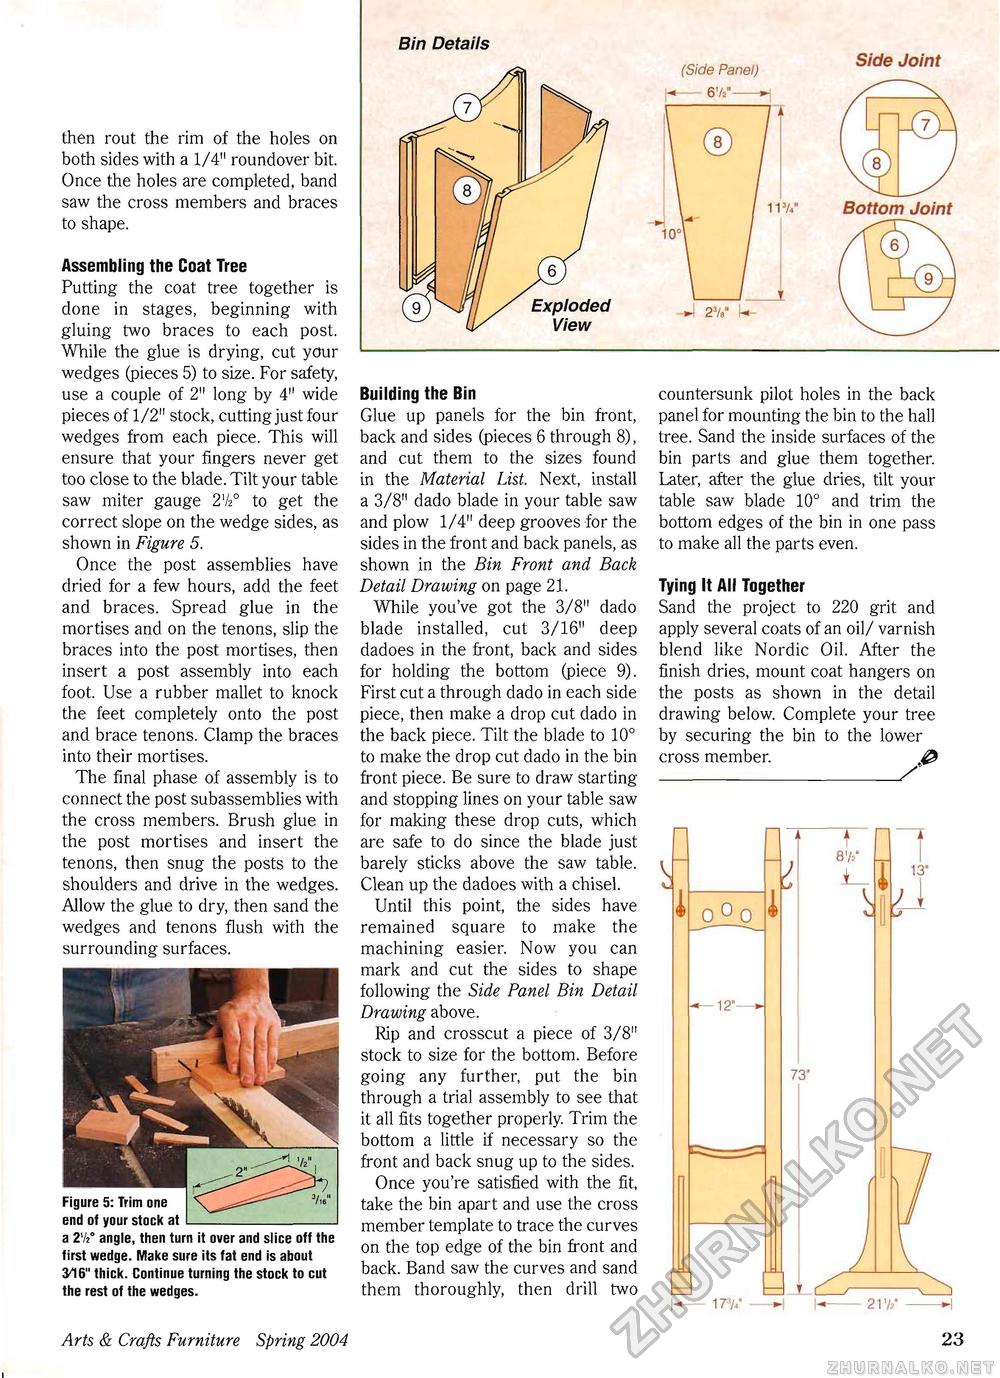
then rout the rim of the holes on both sides with a 1/4" roundover bit. Once the holes are completed, band saw the cross members and braces to shape. Assembling the Coat Tree Putting the coat tree together is done in stages, beginning with gluing two braces to each post. While the glue is drying, cut your wedges (pieces 5) to size. For safety, use a couple of 2" long by 4" wide pieces of 1/2" stock, cutting just four wedges from each piece. This will ensure that your fingers never get too close to the blade. Tilt your table saw miter gauge 27z° to get the correct slope on the wedge sides, as shown in Figure 5. Once the post assemblies have dried for a few hours, add the feet and braces. Spread glue in the mortises and on the tenons, slip the braces into the post mortises, then insert a post assembly into each foot. Use a rubber mallet to knock the feet completely onto the post and brace tenons. Clamp the braces into their mortises. The final phase of assembly is to connect the post subassemblies with the cross members. Brush glue in the post mortises and insert the tenons, then snug the posts to the shoulders and drive in the wedges. Allow the glue to dry, then sand the wedges and tenons flush with the surrounding surfaces. Figure 5: Trim one end of your stock at a Tk° angle, then turn it over and slice off the first wedge. Make sure its fat end is about 3^16" thick. Continue turning the stock to cut the rest of the wedges. Bin Details (Side Panel) i- 67an- Side Joint 2V k nv Bottom Joint Building the Bin Glue up panels for the bin front, back and sides (pieces 6 through 8), and cut them to the sizes found in the Material List. Next, install a 3/8" dado blade in your table saw and plow 1/4" deep grooves for the sides in the front and back panels, as shown in the Bin Front and Back Detail Drawing on page 21. While you've got the 3/8" dado blade installed, cut 3/16" deep dadoes in the front, back and sides for holding the bottom (piece 9). First cut a through dado in each side piece, then make a drop cut dado in the back piece. Tilt the blade to 10° to make the drop cut dado in the bin front piece. Be sure to draw starting and stopping lines on your table saw for making these drop cuts, which are safe to do since the blade just barely sticks above the saw table. Clean up the dadoes with a chisel. Until this point, the sides have remained square to make the machining easier. Now you can mark and cut the sides to shape following the Side Panel Bin Detail Drawing above. Rip and crosscut a piece of 3/8" stock to size for the bottom. Before going any further, put the bin through a trial assembly to see that it all fits together properly. Trim the bottom a little if necessary so the front and back snug up to the sides. Once you're satisfied with the fit, take the bin apart and use the cross member template to trace the curves on the top edge of the bin front and back. Band saw the curves and sand them thoroughly, then drill two countersunk pilot holes in the back panel for mounting the bin to the hall tree. Sand the inside surfaces of the bin parts and glue them together. Later, after the glue dries, tilt your table saw blade 10° and trim the bottom edges of the bin in one pass to make all the parts even. Tying It All Together Sand the project to 220 grit and apply several coats of an oil/ varnish blend like Nordic Oil. After the finish dries, mount coat hangers on the posts as shown in the detail drawing below. Complete your tree by securing the bin to the lower cross member. - 177/ —H h--217?" Arts & Crafts Furniture Spring 2004 17 Exploded View |


